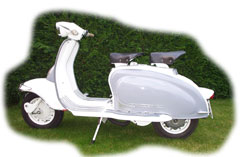
 Here you find detailed information of the complete overhaul of a Lambretta 125cc LI Series 2 from 1961. At the beginning of the job the scooter was in complete and running condition. It was over painted by some
 previous owner and it has a rather used look. There’s as good as no history information on previous owners available.
The final result is a reborn reliable scooter in a mint showroom condition.
This section is divided in the next main parts of the restoration project.
Dismantling
| While dismantling you can’t take enough pictures, especially if it is your one and only scooter so you can’t compare to another assembled model. A parts list and workshop manual are essential items before taking anything apart. Especially the cable routing can give you a hard time if you’re not sure when reassembling. | 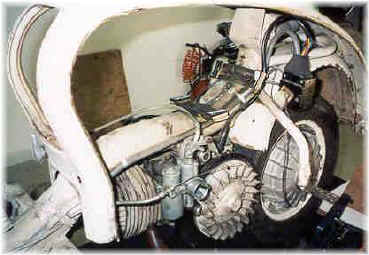 |
 |
Taking apart may look easy and you may think everything seems logic but you’ll be surprised how fast you will be forgotten how exactly this washer was mounted of where this cable was routed. So make notes! A box with lot of separate compartments can be of great help. Also take in mind that a disassembled scooter will take up as much space of two assembled scooters |
| Electrics can be a problem if tampered with. Here again make notes how everything was connected before dismantling. If a previous owner made some alterations to the original fitting it can be hard to get it back to original specifications. | 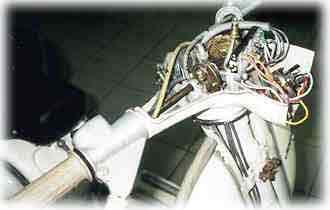 |
Cleaning
|
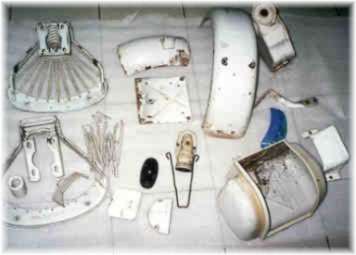
A bunch of parts completely separated and ready for shot blasting. Don’t try to clean them yourself, it’s a waste of time, really shot blasting is the only way to get a proper result and remove all rust that may be even invisible behind the different layers of paint. Be sure to protect all threads with old bolts and nuts or rubber covers before you give in your parts for blasting. Once parts are cleared of paint, dirt and rust you can check them for damage. Some welding maybe necessary. |
 |
 |
Some photos of your parts before they are blasted or painted are always useful later on to clear up some assembly questions that you may have. Also to see how it was painted originally. |
Painting
| It sure takes a lot of time to prepare every item to be completely ready for the painter to do his work. All parts needs one or more layers of primer and then the colour of your choice inside and outside also in multi layers. Dents and bents or rust tracks need to be carefully worked out with filler before the painting for optimal result. | 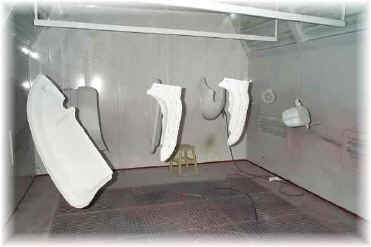 |
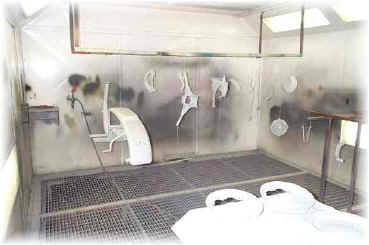 |
It finally pays of to use a professional spray cabin in the end result. Threads and studs need to protected from the paint or you’ll have to clean them afterwards. |
| The rear shock can be taken apart for sandblasting and painting also. Check the silent blocks for wear. A new shock may be an option with prices starting under 50€. | 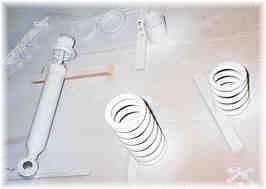 |
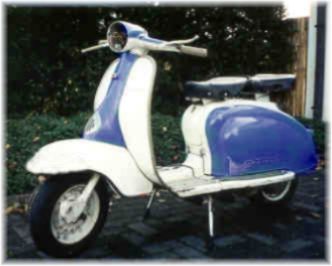
This scooter has finally been repainted in it’s original colours. It’s was only available in two layouts; complete white or white with grey side panels and horn casting. So the decision wasn’t that difficult to make. Some books or works can help you deciding which colours to use.
Repair
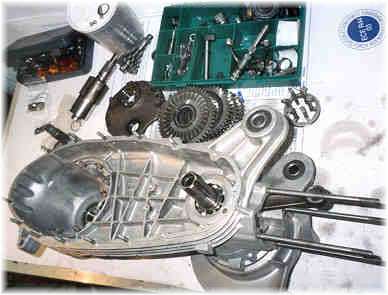 |
This engine casing is as good as new. A pearl blasting removed all the corrosion. The crankshaft has been balanced out and is already installed using new bearings and oil-gaskets on the shaft. Just above the engine mounts you can see the gear selector. Check this part for wear or damage it can be the reason why your scooter jumps out of gear on heavy load. When to far gone it needs to be replaced. Reassembling the gearbox isn’t that difficult but make sure all gears and shims are in the right order. |
| The Dellorto MA18BS7 carburettor consist out of 40 pieces. Handle them with care and give them a good clean and they will work well for another long time. Slides can have some traces of wear but it can work fine. Check the jetting in the table when you’re not sure if it is standard. Most jets are still available. A decent set up carb can make a lot of difference. While the parts are dismantled use a new set of gaskets, it will cost you not more than 3€ and it will stop the leaks of the costly gas. | 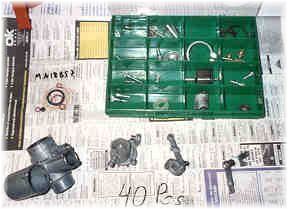 |
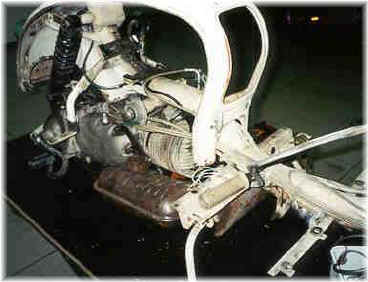
| Besides mechanical repair there probably be some welding to do on the various chassis parts. Especially the feet rests and leg shield are prone to breaking when badly handled. Get some specialized help when you’re not sure what you’re doing. Alloy welding isn’t that easy before you know you’ll end up with more damage than started with. |
Reassembly
A common practice when reassembling is doing a ‘dry mount’. That is try to assemble most parts before they’re finally painted. So when everything is in primer make sure all pieces fit all right in particular when you buy your scooter already dismantled. It’s possible that some extra bending or welding is necessary so beware before you do the final painting.
When using new bolts and nut choose for stainless types, they’re a bit more expensive but it will be rust free for ever. Some dealers like Chambers (UK) can offer complete kits inclusive all special nuts and bolts for a fair prices. Don’t waste your time go searching them locally you’ll always end up missing some bolts.
Pay special attention to the cable routing use you’re photos made when dismantling. Wrongly fit cables won’t work very smooth.
The electric main cable was here also completely swapped for a new one. Make sure you buy the right with or without battery. Also on this scooter there was a pre and post modification possibility. This was a post-mod type which can easily been spot at the brake light contact which has only one connector.
Setup
Setup turned out to be real nightmare, sometimes it start sometimes not, very intermittent.
Especially with a warm engine, starting was very troublesome. A fresh plug mostly did the trick, but afterwards the ‘old’ plug functioned again allright. Also noticeable was that with a cold engine when the lights were switched on that the engine stalls. This scooter still uses the original Filso 4-pole ignition.
Everything was double checked and replaced when in doubt. The points, condensor HT lead, sparkplug cap. After a long period of troubleshooting finally a new HT-coil gave better results.
Result